In 2018 we assisted with a retrofit project to an existing house in Mount Lawley, Western Australia. Our client was seeking to improve the thermal comfort and available daylight in the house, particularly during winter.
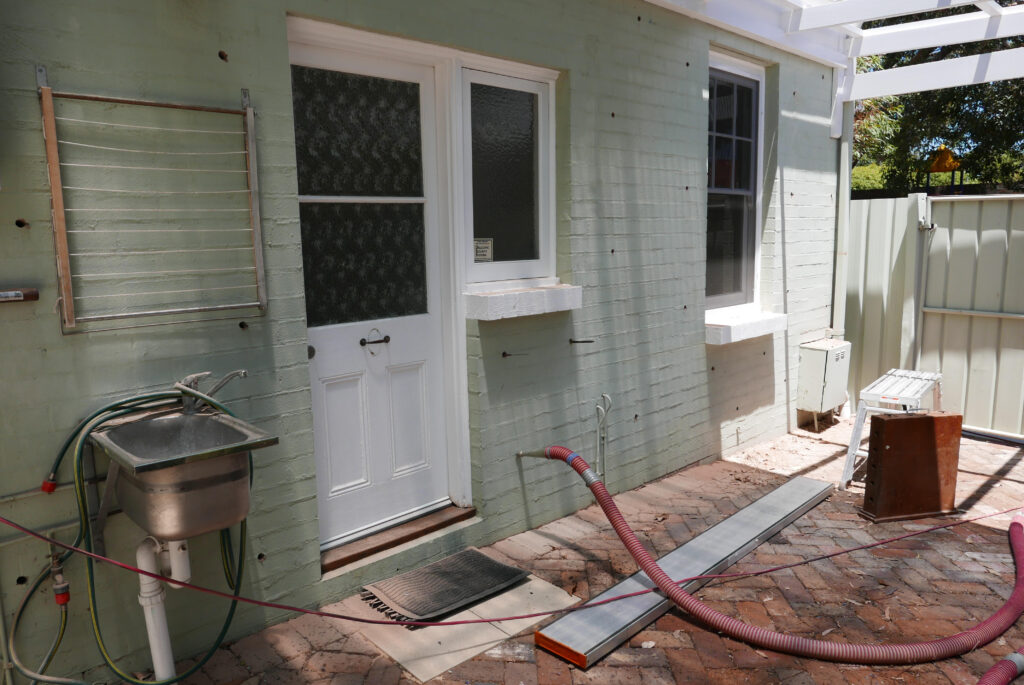
The client’s house was originally built in the early 20th century (around 1905), a modest dwelling constructed of cavity brick, timber windows and metal roof, that was once a corner shop as well as a residence. Previously, the client had completed some ad-hoc improvements to their home, but with mixed success. Rather than risk embarking on a major (and potentially expensive) renovation, what the client really wanted to know was what retrofits or upgrades would provide the best improvement to the thermal performance for a relatively modest budget.
When we design a new home from scratch, we start by using solar passive design principles to ensure the proposed design is optimally oriented, that windows are sized and positioned appropriately and that there is sufficient shading in summer without compromising winter performance. We then conduct a NatHERS assessment of the proposed design to validate the thermal performance and fine-tune the design and construction specification to ensure we can achieve optimal thermal performance for the client’s budget. We find a NatHERS rating can be used as a valuable design optimisation tool and not just for demonstrating minimum compliance.
A similar approach can also be adopted when renovating or retrofitting an existing dwelling, where we start by conducting a NatHERS assessment on the existing house to establish its base performance. This is then considered along with a contextual analysis of the age of the house, floor plan, solar orientation and surrounding environment. By taking this approach we are able to determine the constraints and opportunities presented by the existing dwelling and site, and in turn which areas would most benefit from renovations and/or upgrades.

Based on our inspection of the existing dwelling and information provided by the client, we assumed the following types of construction in the rating of the existing dwelling:
- Floor: suspended timber floor (uninsulated)
- External walls: cavity brick (uninsulated)
- Ceiling: R4.0 insulation (the client had insulation installed a few years previously)
- Roof: steel (no reflective insulation or sarking)
- Windows: clear single glazing with timber frames (leaky and unsealed)
- Internal walls: single brick with plaster
Testing involved/star rating comparisons
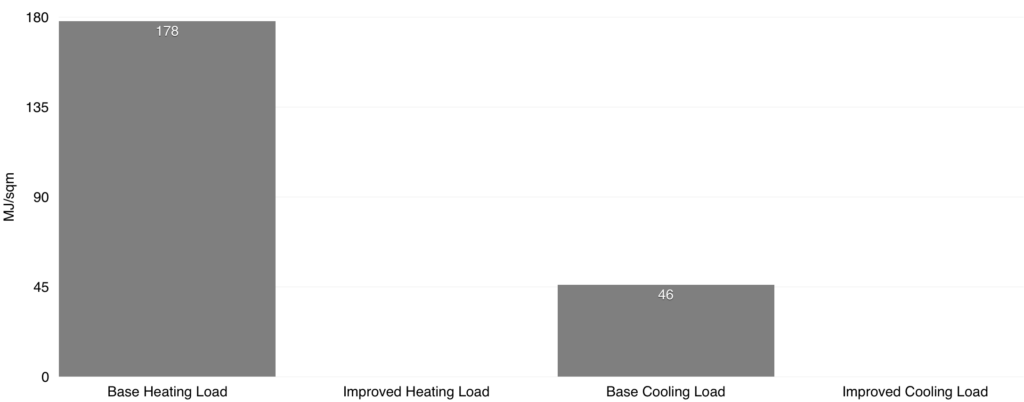
The initial NatHERS assessment of the house resulted in a rating of 2.3 stars – a poor energy performance, but not unusual for a house of this vintage. The rating certificate also provides detailed information on how much energy is likely to be used in the dwelling for heating and cooling, being a total of 223.9 MJ/m2 per annum. The majority of this energy usage (177.8 MJ/m2) was required for winter heating.
Additionally, our contextual analysis of the house identified the following aspects that would likely impact on the thermal comfort of occupants:
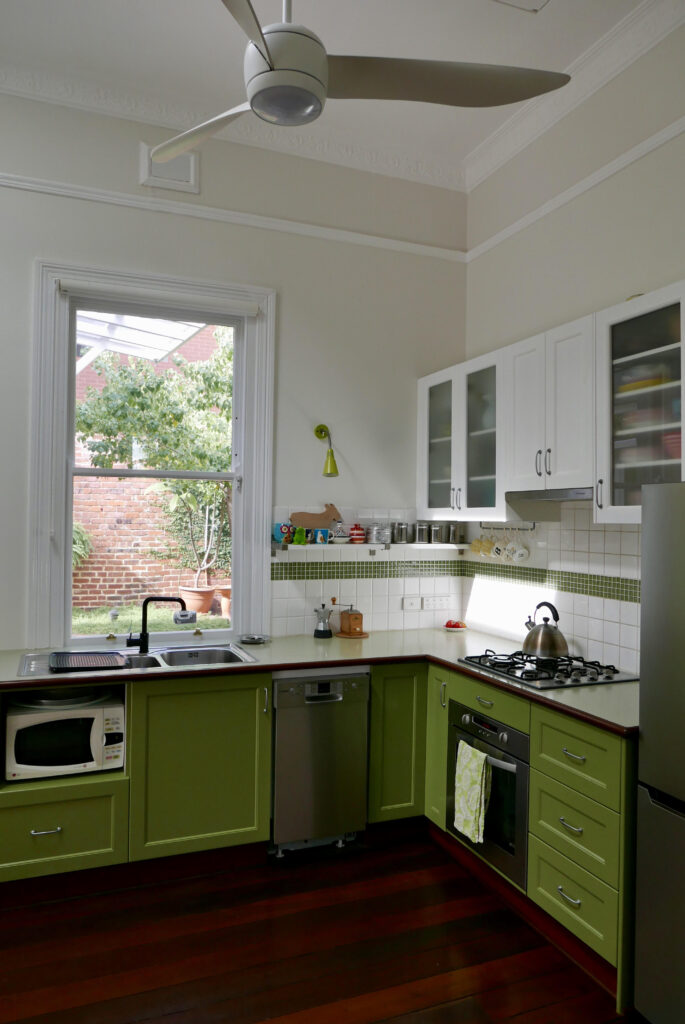
- The kitchen, dining and living areas were situated in the south-west corner of the house, with no external wall facing north; unfortunately this meant that we couldn’t improve the solar passive design of this space without significantly changing the floor plan configuration;
- Even though Anette had done a “no brainer” retrofit and upgraded the ceiling insulation a few years ago, there was still further room for improvement. For example, the cavity brick walls contained no insulation;
- Many of the existing timber sash windows required some restoration to prevent draught;
- High ceilings helped keep the house cooler in summer, but could be detrimental to winter thermal performance by allowing warm air to travel upwards;
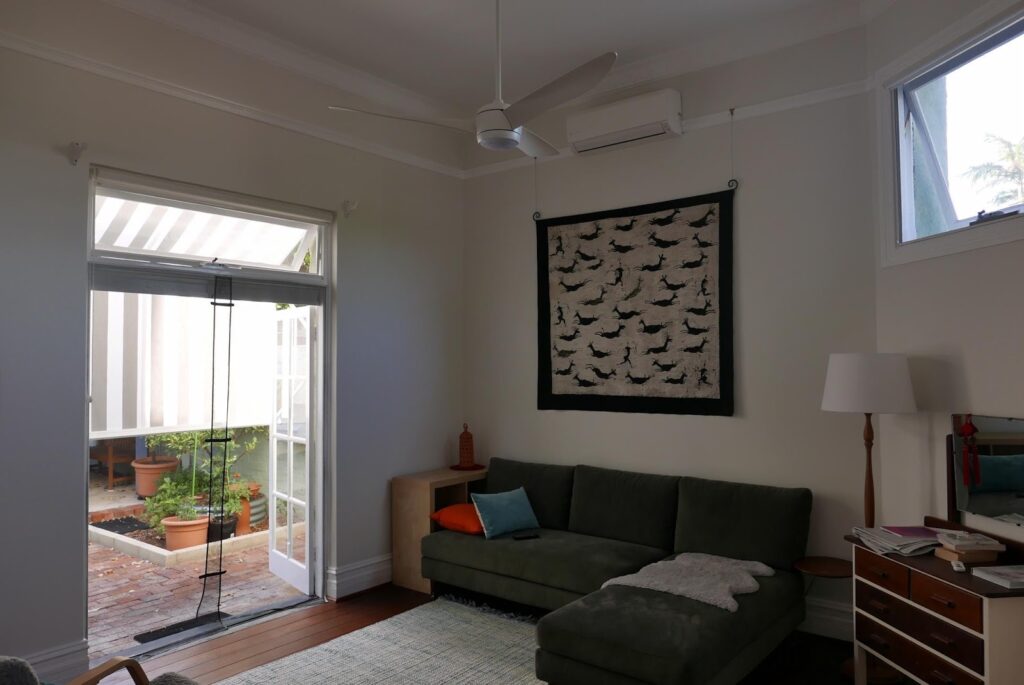
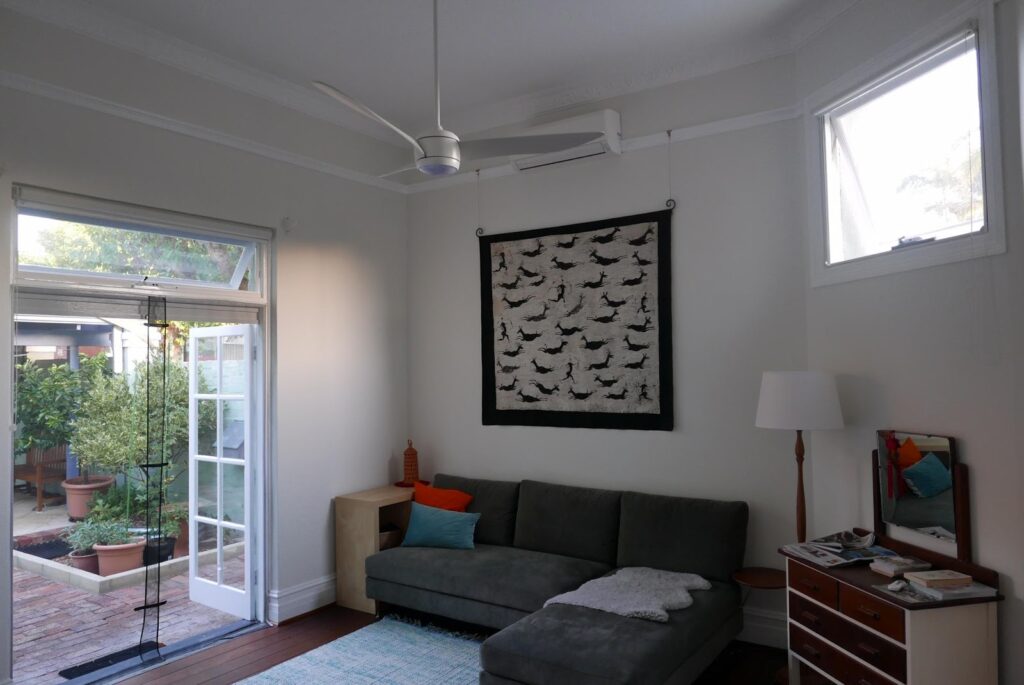
- The main opening for the living room had as east-facing orientation – a fixed awning over this opening helped to prevent too much summer sun in the morning, but made the room dark and gloomy in winter; and
- The external walls were currently a light colour: while this is generally a good idea for helping to keep the house cooler in summer, in this instance it could also be a contributing factor to making the house colder in winter, due to solar reflectance combined with a high level of thermal mass in the building construction.
Based on the identified issues we began testing the impact of different improvements and retrofits using NatHERS software (AccuRate Sustainability), to see which would be the most beneficial for the thermal performance of the house. The retrofits/improvements we decided to test were based on our experience working on other projects, in conjunction with some specific changes requested by the client.
The changes we tested are outlined in the table below, along with the corresponding improvement in star rating. We also tested each retrofit incrementally, so that we could see the individual impact of each proposed change:
| Alteration Recommendations | Star Rating/Improvement | Comments |
| Existing House | 2.3 stars | Star rating of the house currently in its current condition. |
| Restore and draught-seal existing windows | +0.1 stars | Refurbishing the existing windows seemed at first to be an obvious improvement, however it did not appear to result in a major improvement to the house. The cost of this retrofit would also be an important consideration (see later). |
| Change windows to clear double glazing | +0.3 stars | Changing the windows to double glazing helps to reduce conduction gains and losses. We also tested single glazing with a Low-e coating but this did not seem to improve the star rating, but did improve the heating and cooling loads slightly. |
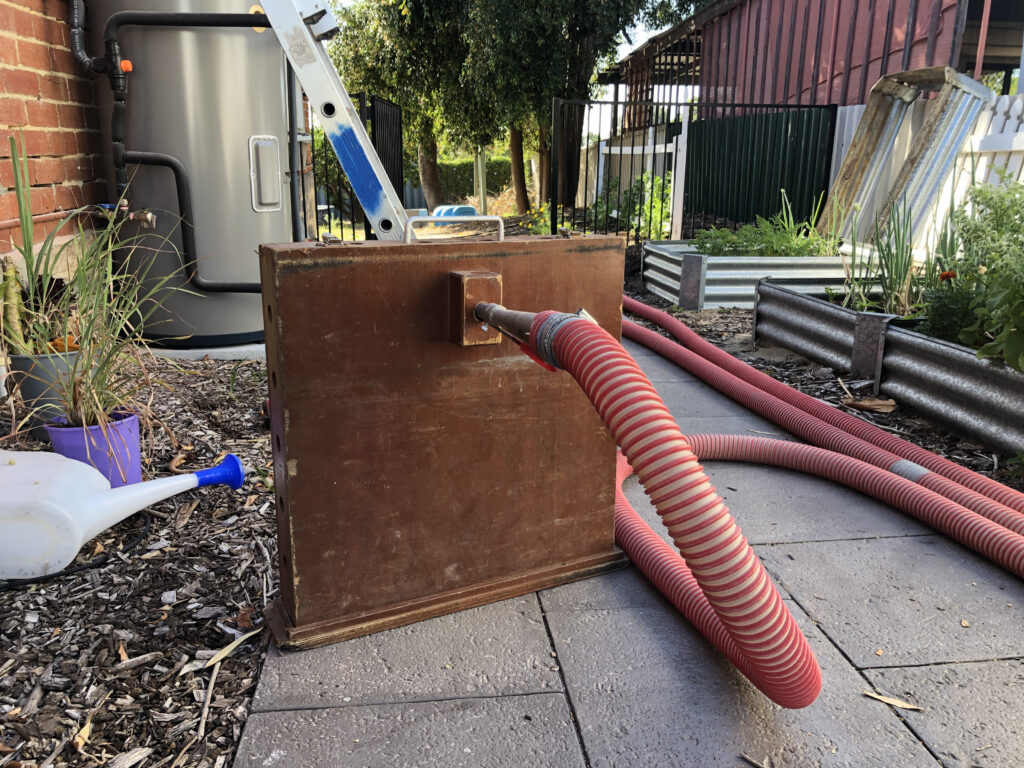
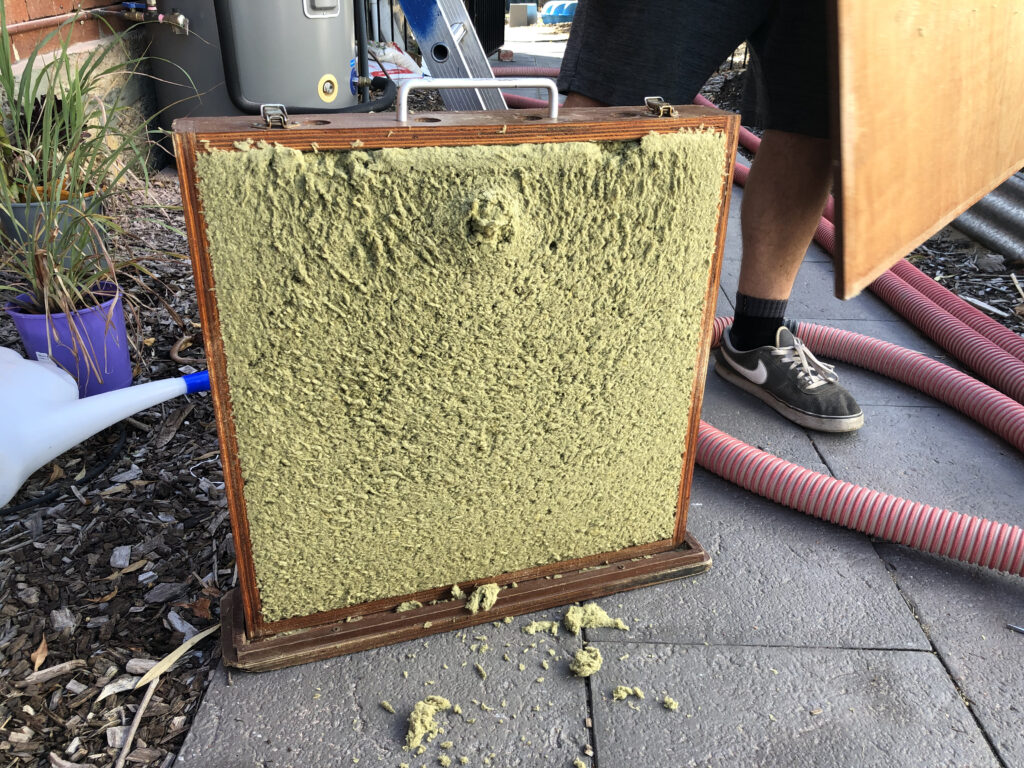
| Add cavity brick wall insulation | +1.5 stars | A blow-in mineral wool insulation product that can be used to fill the cavity of existing brick walls. Small holes into the brick mortar around the building to inject the cavity with insulation. They then patch up the holes with mortar. This insulation is certified as fire safe by the CSIRO, prevents wicking of moisture and increases the total R-value of a typical cavity brick wall to 1.86. |
| Add ceiling fans to bedrooms and living areas | +0.2 stars | The addition of ceiling fans helps with ventilation and cooling in summer. It can also be beneficial in winter, by helping to push rising warm air down to the occupants in a room when operated at slow speeds in “winter mode” . |
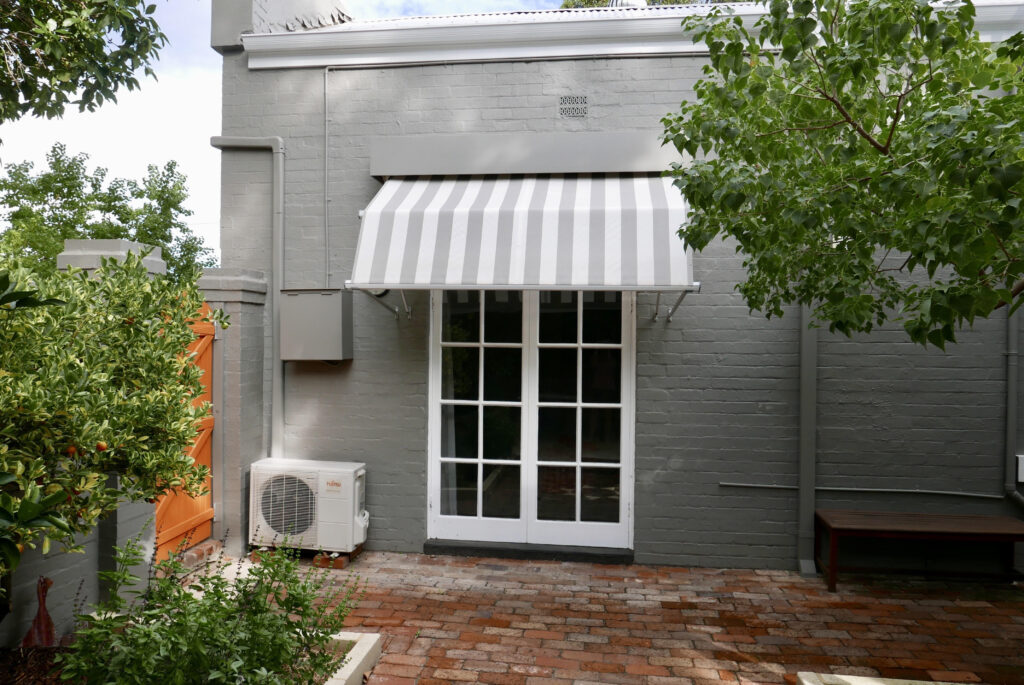
| Replace awning over living room door | +0.1 stars | This allows for more solar radiation to enter the living room, providing greater solar passive gain in winter. |
| Paint external walls to darker colour | +0.2 stars | Typically lighter colours are recommended to help keep the building cool by reflecting more solar radiation in summer. In this instance, because the dwelling has a significantly higher winter heating load, a dark external wall colour provided a greater improvement in thermal comfort. |
| Addition of double-glazed skylight in northern part of roof over kitchen | +0.0 stars | Although the star rating didn’t change by adding a skylight in the kitchen, it did reduce the energy required for heating by 5.4 MJ/m2 a year, in addition to providing more natural daylight to the interior of the house. An operable skylight could also help with flushing out rising hot air during the summer months. |
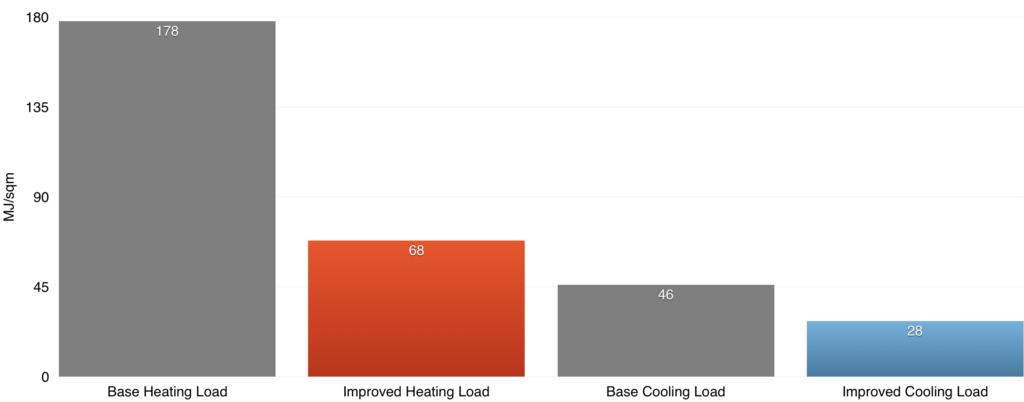
Based on the tested recommendations we found that it could be possible to reduce the total annual energy requirements of the house by 128.1 MJ/m2, which represented a potential saving in the energy required for heating and cooling of 57%. This would double the energy rating of the dwelling to be up to 4.7 stars.
While the majority of the improvement related to the winter performance, it is also important to ensure that summer performance is not adversely affected as a result. When retrofitting for thermal performance, it’s critical that improvements occur across the entire year and that we avoid changes that may improve the winter performance but make the summer performance worse. This was an important consideration when it came to recommending the external wall colour (see later).
Obtaining quotes
We then assisted the client to source cost estimates, suppliers and contractors that could complete the work required. This helped to ensure her budget would be spent on areas that would have the most impact on improving the comfort of their home.
| Improvement | Approximate Cost |
| Restore and seal existing windows | $6,000.00 |
| New external doors with double-glazing | $14,400.00 |
| Cavity brick insulation | $4,000.00 |
| Ceiling fans | $1,600.00 |
| New retractable awning | $1,800.00 |
| Dark colour paint to external walls | $4,500.00 |
| New skylight | $4,000.00 |
| Total | $36,300.00 |
It was interesting to note that repairing and upgrading the doors and windows would be the most expensive retrofit items, but our analysis suggested it would only result in a modest improvement in thermal performance. While the design and specification of the external doors and windows can have a significant impact on the thermal performance of a home, it’s important to adopt a holistic approach and consider the entire building fabric and other retrofit opportunities that may provide better value for money.
After reviewing all the quotes, the client decided to initially proceed with the following five improvements:
| Selected Improvement | Approximate Cost |
| Cavity brick insulation | $4,000.00 |
| Ceiling fans | $1,600.00 |
| New retractable awning | $1,800.00 |
| Dark colour paint to external walls | $4,500.00 |
| New skylight | $4,000.00 |
| Total | $15,900.00 |
Including our architectural and consulting fees of $1,950.00, the total cost of the initial scope of work came to around $17,850.00. We believe this represents a comparatively modest renovation cost and would result in an improved star rating of 4.3 stars. In addition to improving the amenity and comfort of the client’s home, we would also expect to see a reduction in the heating and cooling energy usage once these retrofits are implemented.
Over the next several months, the client proceeded with organising and booking in the respective trades required to complete the work.
More about cavity wall insulation
Traditionally external walls constructed from brickwork incorporate a nominal 50mm air cavity between the inside and outside skin of brickwork. A common misconception is that the cavity helps to increase the insulation value of the wall; in reality, an uninsulated cavity brick wall has a total R-Value of only around R0.69 (which is not very high).
Because clay bricks are porous, the purpose of the cavity is to prevent rain and moisture from reaching the inside leaf of brickwork, which could then lead to mould and condensation problems within the building interior.
While it is still technically possible to build external walls without added insulation (and provided they are appropriately shaded and have a minimum surface density), the National Construction Code recommends a minimum R-value of R2.8 for external walls in climate zone 5 (Perth). It’s for this reason that we recommended retrofitting cavity wall insulation for the client’s home.
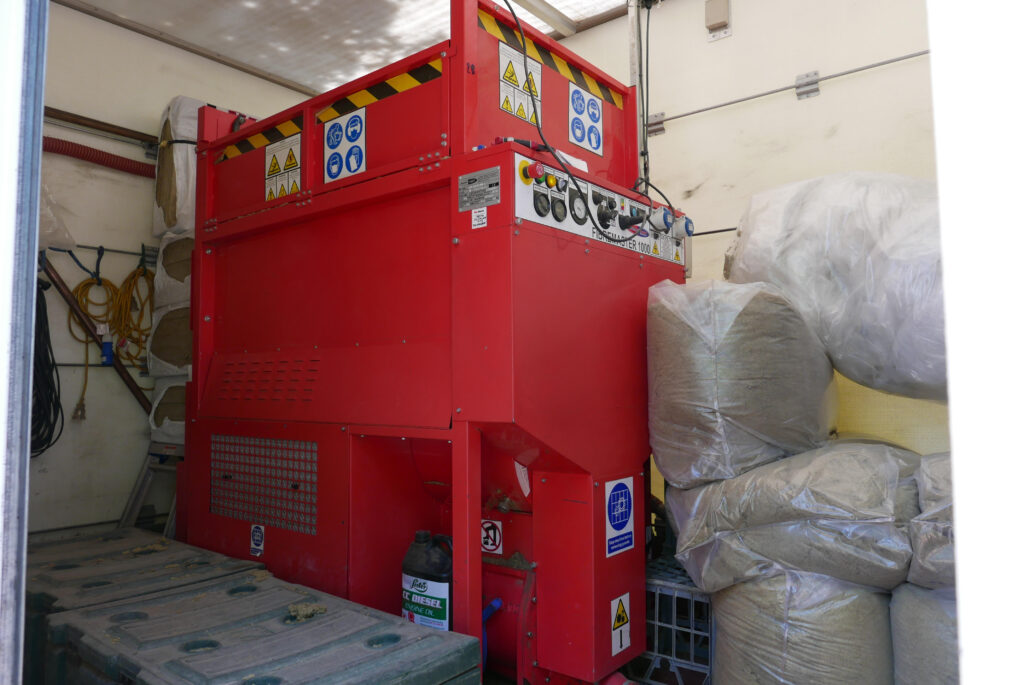
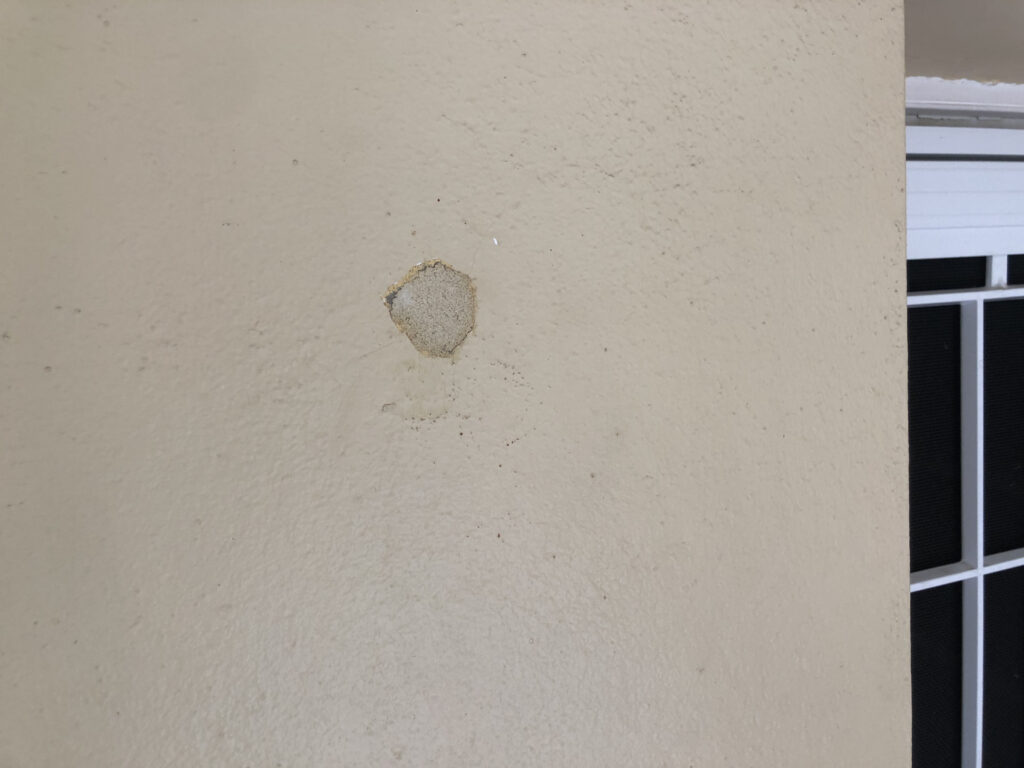
There are just a handful of insulation products available for cavity brickwork, but not all of them are suitable for retrofitting into existing dwellings. All of the products we investigated involved drilling holes in the external wall at regular intervals and blowing in a granulated insulation product. Most installers patch up the holes as part of their scope of work, but they do not include painting. As the client was planning to repaint her home anyway, this wasn’t too much of an issue.
One product/installer we found used small polystyrene balls as the blow-in insulation material, similar to what is found in a bean bag. While it offered a reasonable R-value (up to around R1.9), we were concerned of the environmental impacts if the balls were to escape into the environment and waterways (which is probably inevitable). When evaluating energy efficiency upgrades for an existing home, it’s again important to take a holistic approach to avoid unintended consequences or perverse outcomes.
We ended up selecting a granular insulation product made from volcanic rock – it’s generically called mineral wool, but it is commonly known by the trademark Rockwool. In a 50mm cavity brick wall, it achieves a total R-value of around R1.8. While not quite as high as the polystyrene alternative, there were other benefits to selecting this type of insulation.
Because Rockwool has quite a high density compared to other types of insulation, it also has good acoustic properties. When installed correctly, it compacts slightly under its own weight and stays in place, making it less likely to escape into the environment if an insulated wall is demolished or opened up as part of a future renovation.
It is also non-combustible, being widely used in the shipbuilding industry for this reason. An added environmental advantage we subsequently discovered is that the granulated Rockwool we selected is made from industry offcuts. By repurposing what would otherwise be considered a waste product, the result is a high-value product for another industry.
Most importantly, mineral wool has excellent hygrothermal properties, having a high vapour permeability and water repellency. This means that moisture does not get trapped or absorbed by the insulation, preventing condensation and water ingress into the interior of the building. The installer we selected offers a 10 year installation warranty, and was also able to provide testing certificates and compliance documentation for all of the product performance claims. For these reasons, we were confident in selecting this product/installer for the cavity wall insulation.
Dark external wall colour – the right choice?
Generally, we recommend clients to choose light colours and finishes for the external colour scheme of their home (ie. a low solar absorptance). This strategy helps to prevent overheating of the building in summer due to the impact of incident solar radiation on the external surfaces. While there may be a small thermal performance benefit in winter by selecting finishes with a high solar absorptance (ie. darker colours), any such gain would be offset by a significant increase in the building’s cooling loads over summer.
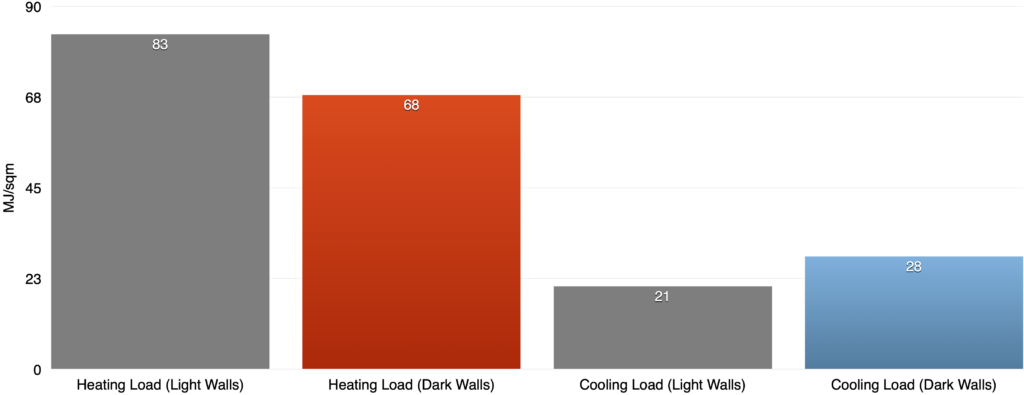
Curiously, while testing different retrofit options for Anette, we found the opposite to be the case: a darker external wall colour performed better than a lighter one (note the roof was existing and remained unchanged, with an assumed solar absorptance of 0.5). As can be seen in the following graph, while the cooling load did increase over summer by around 7.0MJ/sqm/year, the heating load in winter reduced by 15MJ/sqm/year. Overall the entire year, the total loads for the dark coloured walls was 8.0MJ/sqm/year less than the light coloured option. This was contrary to previous experience on other projects we have worked on.
To help ensure this wasn’t an anomaly or glitch in the energy rating software (and therefore give our client the wrong advice), we decided to investigate further by looking at the internal temperatures, not just the heating and cooling energy loads.
With some invaluable technical advice from Tony Isaacs and Alan Pears, we were able to reconfigure the energy rating software to do a free-running temperature simulation of the living room for both an extreme week in summer and winter. A free-running simulation assumes that there is no artificial heating or cooling that gets “turned on” when the internal temperature falls outside of the comfortable conditions – this allows us to see how the building is performing without the assistance of mechanical air conditioning.
We then compared these extreme weeks for both the dark and light coloured walls:
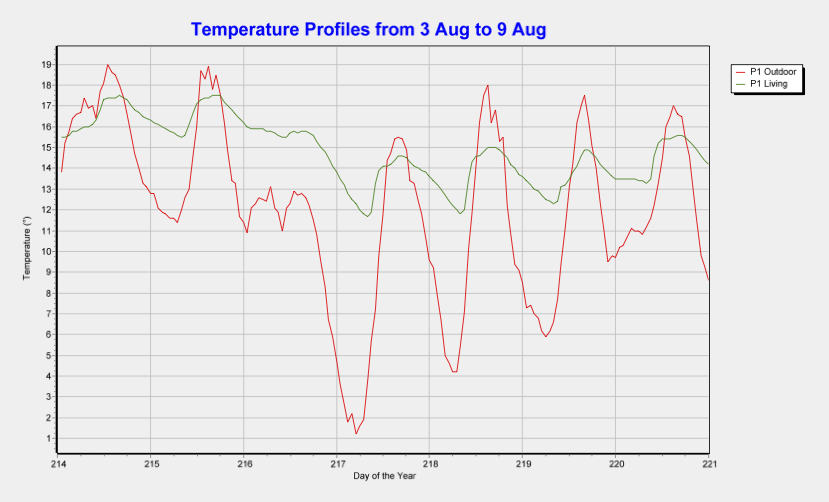
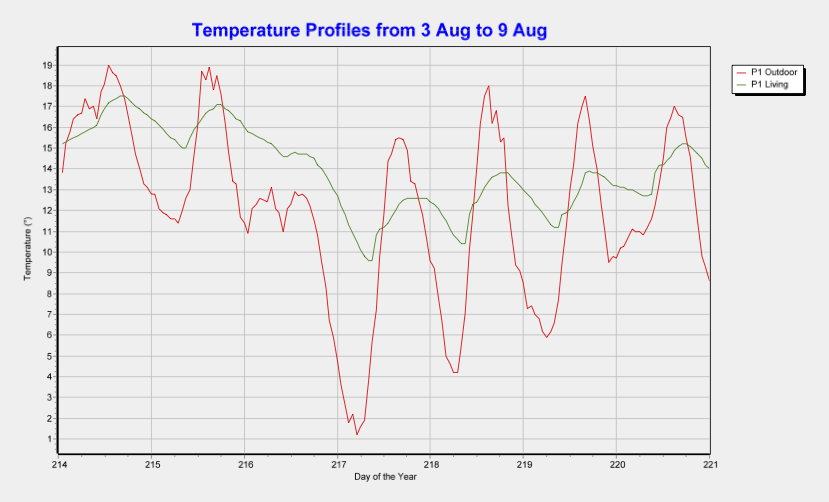
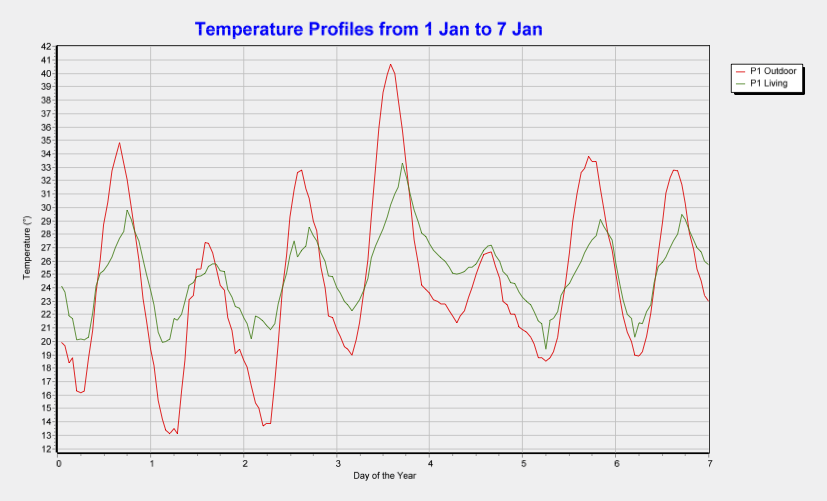
In the graphs, the red line represents the outside temperature, while the green shows the temperatures within the living room. Comparing the first two graphs, there is a noticeable drop in the living room temperature over the week when the walls are light in colour. This makes sense, as more solar radiation would be reflected by the external walls due to the lower solar absorptance. As Perth is a heating load dominated climate (ie. there are more days of the year that require heating compared to cooling), and when extrapolated across winter and parts of autumn and spring, the light coloured walls could have a detrimental impact overall.
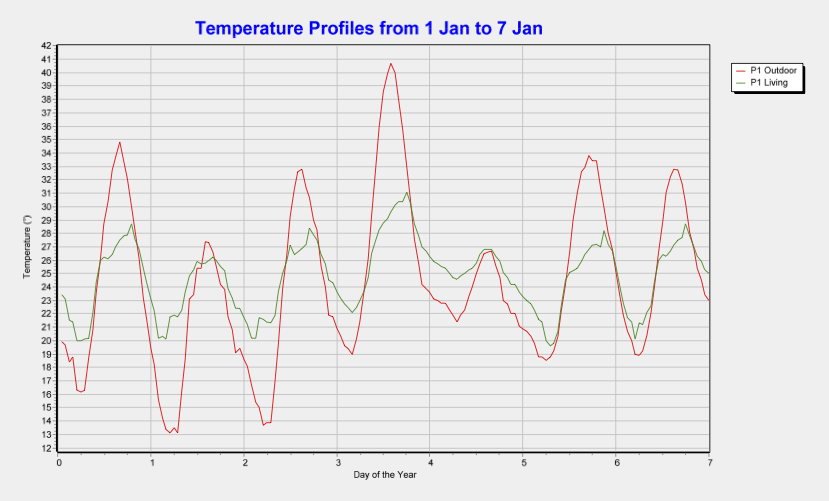
When comparing the extreme week over summer, it is interesting to note that the living room temperature is very similar with both the light and dark coloured walls – the graphs even seem to suggest that the dark coloured walls perform better by around 1-3 degrees. Tony Isaacs was kind enough to have a detailed look at these outputs, and hypothesized this may be because the temperature outputs from the rating software don’t account for the impact of the air speed on the internal temperature ie. This is due to a limitation in the software.
After examining the detailed temperature data and seeking further technical advice, we were reasonably confident we gave the client the correct advice by recommending the dark external wall colour. As their house has a very small floor area (around 66m2) and thus volume, but a very high proportion of thermal mass and also doesn’t have optimum solar orientation to the living areas, we believe these are all contributing factors that mean this is one of those rare exceptions to the rule!
So how has the house actually performed?
The client completed the first round of selected retrofits to their home just before the winter of 2019. They have kindly provided us with regular updates on how the house has performed at the end of each season, and we’ve been really pleased to hear that there has been a noticeable improvement in the thermal performance of their home.
At the end of the season, the client provided us with a comprehensive spreadsheet comparing their gas usage (for space heating) before and after the cavity insulation was installed, as well as the ceiling insulation completed prior to our engagement.
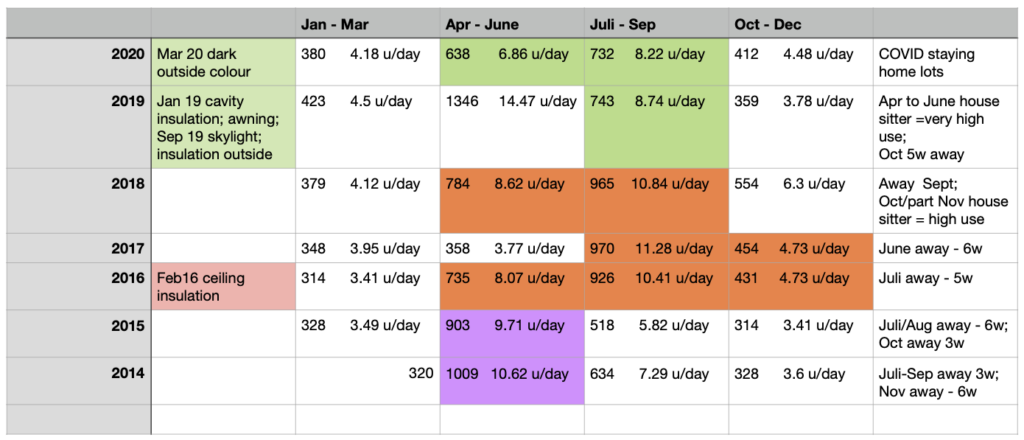
In the client’s words:
“The table shows that there is a noticeable drop in gas use: first, roughly a 20% reduction after installing the ceiling insulation in 2016 and the second, another 20% reduction after the completion of the retrofits.”
The client also provided us with detailed feedback on the operation of their ceiling fans in winter mode, which can be used to help circulate warm air throughout a room or space:
“The winter mode … is more effective when used in combination with the reverse cycle air conditioning (for heating) which I have used on a couple of occasions as a trial. Using the ceiling fan with the gas heater doesn’t quite work – when the warmed air gets pushed down the thermostat in the heater is too responsive and switches off the heater. I feel confident now that I could heat the house with the reverse cycle air conditioner, whereas before all the changes it needed that massive heat output from the gas heater.”
And the dark external wall colour?
“I don’t think it made much of a difference (over summer) – the wall insulation is pretty convincing in what it does (slowing the heat transfer down), and the house has good cross ventilation which cools the house overnight. The rooflight, helps to allow warm air to vent vertically. The cross ventilation and the rooflight venting work even when there is no breeze.
This summer had a few periods of hot days and nights, without any breeze, but even then I didn’t need the air conditioning very much. I think there was one day in December where I ran the air conditioning for most of the day, but other times it was for a couple of hours because of sticky humidity.”
Since completing the first round of retrofits, the client has since gone on to upgrade the windows with new brush seals and single low-e glazing, with the additional benefit of improving the acoustic performance of their home. They’ve also had weatherseals added to her front door, and is keen to see if these retrofits result in further thermal performance improvements over the coming winter.
The new roof light and retractable awning have also noticeably improved the availability of natural daylight in the main living area.
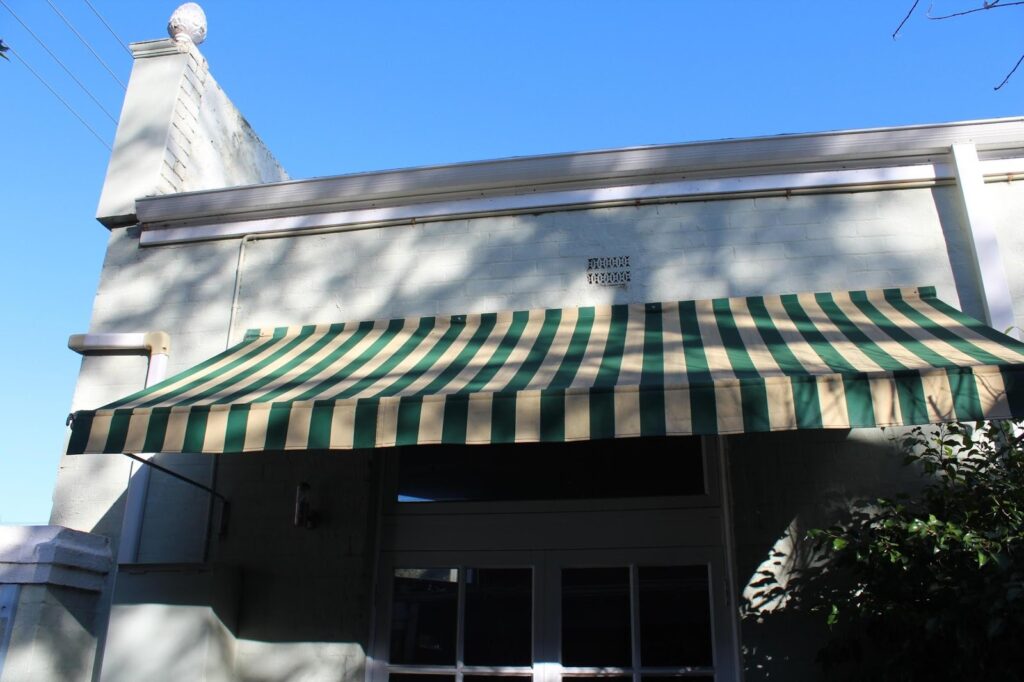
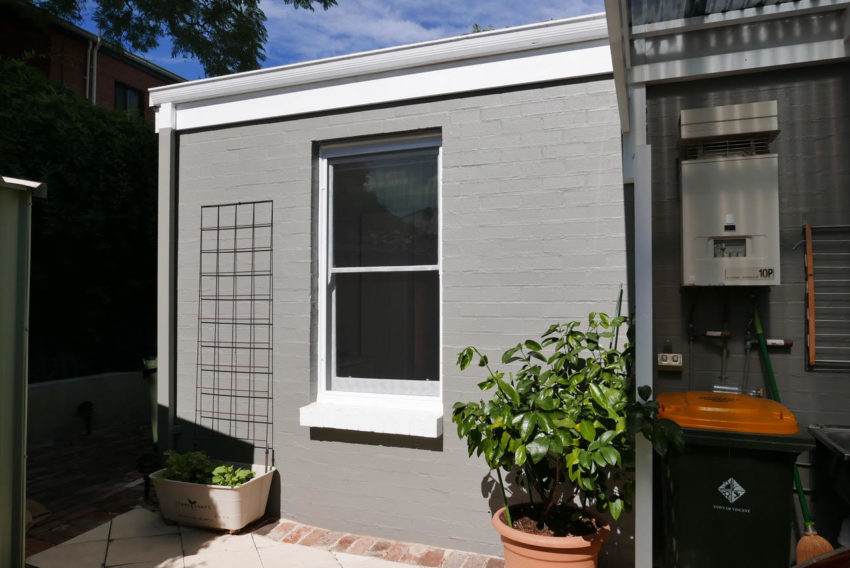
The existing fixed awning over living room doors. Whilst good in summer created for a dark living room in winter.

Conclusion
As can be seen in this case study, there are significant benefits to making design decisions based on the energy rating of the existing dwelling. Testing the various design options allowed the client to make educated decisions about what would provide the best value for money and improve the thermal comfort of the dwelling. The client also made the following observations:
“The painting of the house and the replacement of the old, unsafe canvas awning were two jobs that had to be done anyway at some point as part of regular maintenance – so it wasn’t really an additional expense but a more clever use of money spent on maintenance. I had also wanted to replace the two old-fashioned light fittings in the living room and kitchen because they were so daggy – and the answer was a clean-looking ceiling fan with an in-built light.”
Thus, by using the energy rating to inform their choices for the maintenance work that was otherwise required, the thermal performance of the client’s home was concurrently improved for essentially no extra cost.
While it would have been preferable to achieve a 6.0 star or better energy rating for the retrofit, limitations such as cost, the site and existing building fabric did not make this feasible. Nonetheless, halving the heating and cooling energy and improving daylight availability compared to the original dwelling has still made a substantial difference to the comfort, amenity and running costs of the client’s home.
Even though the CHENATH thermal simulation engine behind NatHERS is reasonably sophisticated, it’s important to remember that all modelling tools have their limitations or may be based on assumptions that don’t apply in all circumstances. The detailed analysis of the living room temperature helped us to ensure that we were giving appropriate recommendations to the client regarding the external colour of their home.
As architects and building design professionals, we are passionate about making a positive contribution to the built environment. By adopting an evidence-based approach and using simulation tools such as NatHERS to inform our design recommendations, our work can have a positive environmental impact as well as an aesthetic one. It’s also incredibly rewarding to work with such an engaged and informed client, and we look forward to receiving their continued feedback on the performance and comfort of their home.
Many thanks to Dannielle Robertson for her assistance with this project and writing this article.